 |  |
Next to words, images are essential in getting an idea across in blogs or Web sites. Just as quickly as they can enhance your presentation is as quickly that a bad image can hurt it. The photos above show you just how much a few errors can ruin an image. The one on the left was saved correctly; the one on the right was not. Read on for everything you need to know to show the best images possible on your site or blog.
The Mode
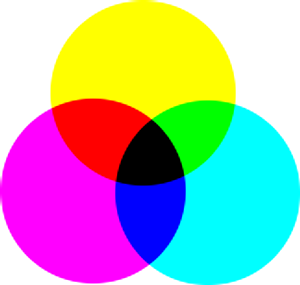
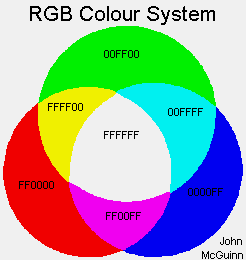
There are two color modes or gamuts: RGB, for red, green and blue, and CMYK, for cyan, magenta, yellow and black. They behave differently because they are geared for two very different kinds of presentation. RGB is used for online or any kind of projected display. What this means is that color is perceived by light that is projected directly into the eye. CMYK is used for print, and color is perceived by the way light reflects off of the colors on the paper.
 |  |
Here you can see how the two modes are different in how the colors mix. RGB is "additive," meaning that the more colors you blend together, the lighter it appears because you are adding more projected light. CMYK mode is "subtractive," meaning that the more colors you mix together, the darker it appears.
Even if the purpose for an image is that it will be printed, most will work on and tweak the image in RGB mode, get it looking the way they want, and then will switch to CMYK and make final adjustments to the color for print.
JPG and GIF
The next greatest factor in how well your images display on a Web site or blog is how you saved the file. JPG and GIF are the most common image file types for online show, and all Web browsers will recognize and display these two file formats. You will recognize these image types by the file name itself, before you open to view the image, by the file's extension - image.jpg or image.gif.
Your computer uses file extensions to identify the file type and the specific application that created it. For instance, you will see .doc for files created in Microsoft Word, .txt for basic text files that are created in Notepad, and .pdf for files saved in Adobe Acrobat for display in Acrobat Reader. When your computer sees a file with .jpg or .gif as the extension, it will either open the image viewer, or a graphics editing program like Photoshop, if you have it installed.
JPG and GIF are compression techniques.
Unlike other file types, JPG and GIF are actually compression techniques or routines. In general, compression is a way to make the image files as small as possible for the quickest online display. You'll know immediately if an image hasn't been compressed or optimized because you'll be waiting for it to download to your computer, even if you have the fastest connection speed. Image files can be huge if you're not careful. And as a general rule, people won’t wait very long before clicking to go elsewhere.
How these compression techniques work is a bit technical, but by understanding the basics, you will know when to use JPG or GIF and have the best image quality with the fastest download time. JPG
JPG
Behind the scenes of any file is a bunch of instructions that tell your computer how to display the file on your screen. JPG is a "bitmap" in that its instructions actually tell each pixel on your screen exactly which color to display. Bitmap or JPG is the best for photographs because it can display just about an infinite range of colors, far more colors than our eye can actually perceive. By giving each pixel its own individual instruction, it can smoothly display very slight variations of color or grayscale that you see in, for instance, gradient transitions from one color to another or in shadows.
JPG is "lossy" in its compression. Because each individual pixel has its own instructions, the compression technique looks at each pixel and its neighbors and will throw out any that are similar. If you open a JPG file in any kind of image editing program and save it again, it will run the compression routine on the file again, and throw out more pixel instructions. So, each time it is saved, it loses quality. This is also why you will notice a significant loss in image quality if you attempt to make the image larger. The instructions were thrown out, so you will have blocks of color to make up for the lost information - pixilation. GIF
GIF
GIF instructions are very different than JPG's per pixel ones, and is best used for any image with large areas of solid color. The GIF format is "vector," which means it describes solid shapes and fills those shapes with one color. It is like this: Draw a line from point A to point B, a line from point B to point C, and another from point C back to point A, then fill it with blue.
GIF is "lossless" in that no matter what size you choose to make the image, it will still show solid color. The compression works by adjusting each set of instructions that describe the solid shape. You can define an area of your image to be transparent so that any background color you display the image on will come through. GIF images can also be animated. The limitation of GIF, and why it fails miserably for use with photographs, is that it is limited to only 256 colors. Gradients will come out banded.
So, which do you use?
The best judge of which to use, JPG or GIF, is your eye. However, I use my computer to help me. Most image editing software will show you the size of the file and allow you to switch between JPG and GIF to compare how effective the compression is. Choose the one with the smallest file size! Here are some additional things to think about:
- Always save your original and work from a copy. This is especially important when working with lossy JPG images since each time it is saved, information is thrown out.
- JPG images will begin to show loss of quality if the size of the image is increased beyond 20%.
- Save photographs in JPG. You will notice that most digital cameras save in JPG format already.
- GIF works best for flat text and logos. If there are any special effects like shadows or beveling, you may have to save in JPG.
- JPG gives you the option, usually as a slider, of how much compression to use. Save at the lowest level without losing quality for the fastest possible download speed.
- GIF allows you to choose how many colors to use to help with the compression. Again, choose the least number of colors without quality loss for the most compression.
I hope you found this information helpful. If you have any questions, feel free to ask!

Great tips. Thank you,
ReplyDeleteYou're most welcome, Professor.
ReplyDeleteYou have a wonderful blog. The tips for bloggers are always welcome. I know I appreciate them.
ReplyDeleteThanks
http://reikihospice.com/unknown
Thank you, Reiki! I used to teach Web design at the undergrad level. It's good to be able to share that knowledge.
ReplyDeleteI'm glad you like the blog - hope to see you again!